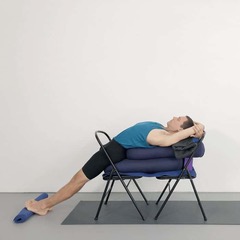
Salamba Purvottanāsana is a great example of an Iyengar method restorative pose that can help rejuvenate energy levels. Much of what is today known as restorative yoga has evolved from the teachings of the contemporary Indian yoga master B.K.S. Iyengar. His innovative usage of props allows the practitioner to remain in supported positions for longer periods of time, in yoga poses that might otherwise involve effort and fatigue.
The supported version of Purvottanāsana described in this post is well suited to times of tiredness or illness, and has many potential therapeutic applications. It is a great pose to include in a home yoga practice at times when energy needs to be preserved. Whilst in the pose the chest is held in an open but supported position. The degree of chest opening is similar to what might be achieved with more dynamic backbends, but can be sustained for a considerably longer duration of time. A practitioner would ideally stay in this pose and soak up it’s benefits for at least five or ten minutes. Remaining in the pose for an extended period of time has a calming effect on the nervous system. It can help to combat stress and counteract lethargy from mental and physical exertion.
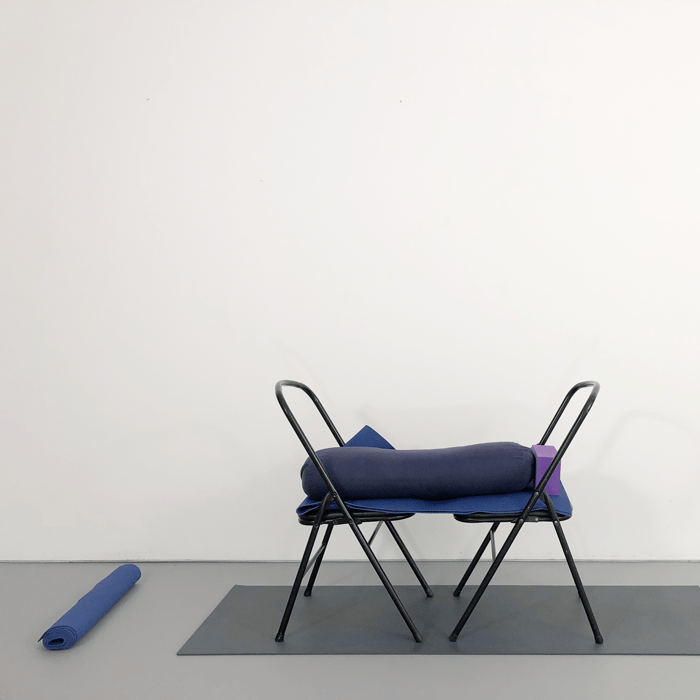
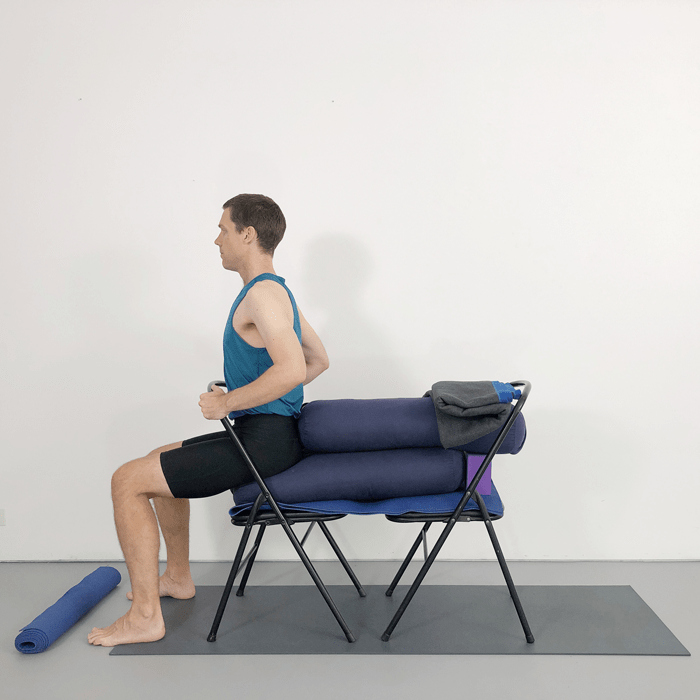
Set up your chairs and other props
Position two chairs closely together so that the fronts are facing.
Fold a yoga mat in half, and drape the mat over the seat of both chairs. This will help to link the chairs together and prevent them from sliding apart.
Place a bolster on the seat of the chairs.
Ensure that the end of the bolster is level to the edge of the first chair that you will be sitting on.
The other end of the bolster will not quite reach the edge of the other seat. Place a block on its side edge in the section of the seat that overlaps the end of the bolster. This block will help to support the next bolster layer and will prevent your head and shoulders from sinking downwards.
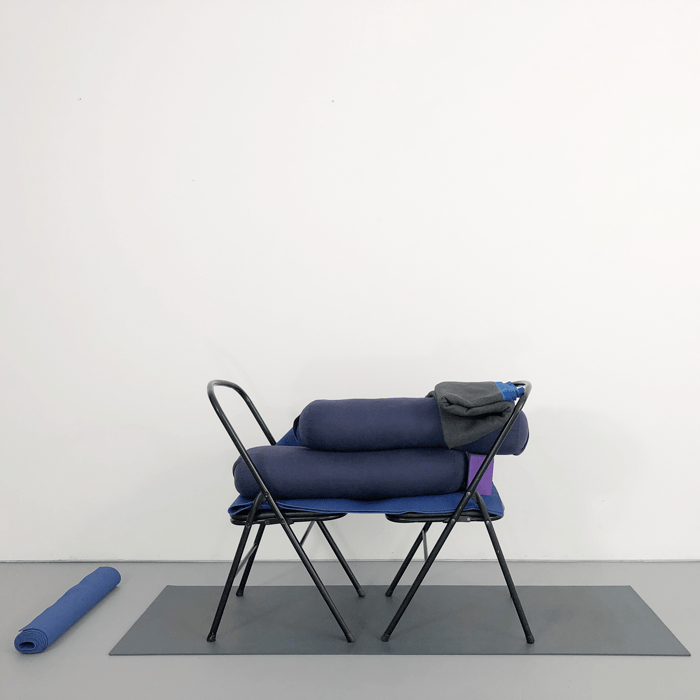
Build a bit more height
Now place a second bolster on top of the first.
Ensure that the top bolster overlaps the bottom bolster by around 20cm or 8 inches. The exposed section of the bottom bolster is where you will eventually sit.
The other end of the top bolster will be supported by the block.
Place a three-fold blanket at the end of the top bolster. Your head will eventually rest onto this blanket.
Position yourself
Before lying back over the chairs, prepare a support for the balls of your feet. A rolled yoga mat is ideal for this purpose, but other nearby objects will do in a pinch. Anticipate how far this foot support will need to be away from the chair, and place it in position.
To position yourself on the support, begin by sitting on the top bolster with your legs straddling either side of the support. Bring one leg through the inside of the chair frame and then slide forwards so that you are sitting on the bottom bolster.
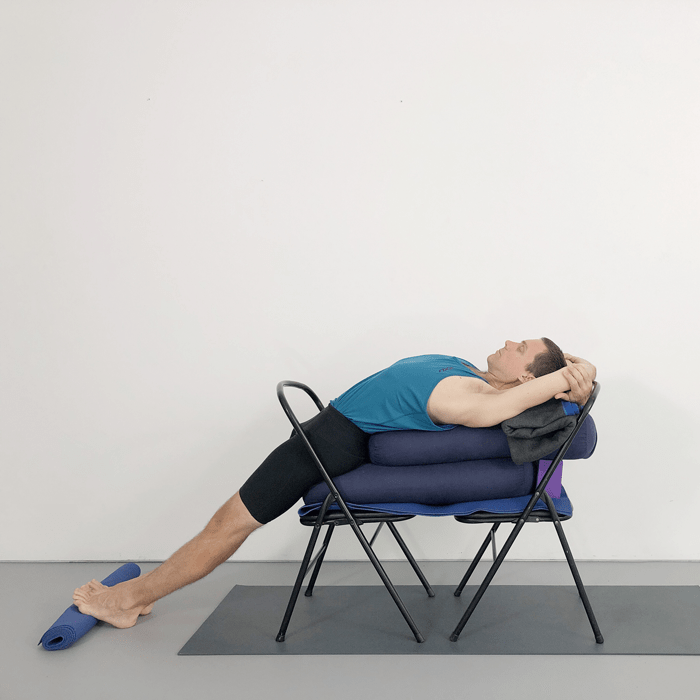
Keep your knees bent and have your feet flat to the floor, as you lie back over the top bolster.
Position head on the three-fold blanket so that the tops of your shoulders are level to the edge of the blanket.
Tuck buttocks towards your knees.
Now straighten the legs.
Turn inner thighs down, calves outwards, and press your big toe bases down and into the rolled mat.
Allow arms to release down by your sides.
Relax…
In addition to having arms hanging down by your sides, another option is to fold and bring them overhead to rest on the support.
Fold your arms in such a way that, gently clasp each elbow with the fingers .
This light grip is sufficient to stabilise your elbows at a shoulder width distance. You can then consciously allow shoulders to release in a downward and outward direction.
As you remain in the pose observe how your breath starts to become soft and smooth.
As chest is lifted up by the supports, allow your abdomen to relax and release in a downward direction.
Ensure that your jaw muscles, tongue and eyes are free from tension.
Conclusion
Salamba Purvottanāsana is a rejuvenating pose that is commonly used in the Iyengar method. It can have specific therapeutic applications in a yogāsana class context, but is also a great pose to include in one’s home practice. It is an ideal pose to practice during times of fatigue or low energy. Remaining in this pose for around ten minutes will maximize its potential benefits.
Focusing on regulating your breath can help calm your mind
September 6, 2022/Cleveland Clinic healthessentials
The late Buddhist monk Thích Nhất Hạnh once wrote, “Breathing in, I calm body and mind. Breathing out, I smile. Dwelling in the present moment, I know this is the only moment.”
How incredibly peaceful does that sound? Breathing techniques like 4-7-8 breathing can help you tap into your inner calm, benefitting everything from your stressed-out nervous system to how well you sleep at night.
Integrative medicine specialist Melissa Young, MD, explains how to do this soothing style of breathing and what health benefits it can provide.
What is 4-7-8 breathing? The 4-7-8 breathing technique is a style of intentional breathwork that can calm your mind and body. Though popularized in 2015 by integrative medicine specialist Andrew Weil, MD, it has ancient roots in the yogic practice of prāṇāyāma, or focusing on the breath.
The gist of it goes like this:
Inhale through your nose for four counts.
Hold your breath for seven counts [regard it as a pause, rather than as a ‘holding’].
Exhale through your mouth for eight counts [exhale through the nose, as directed by Mr. Iyengar in Light on Prāṇāyāma].
But there’s a little bit more to it if you want to ensure that you’re tapping into all of its health benefits.
The benefits of 4-7-8 breathing “Yoga breathing techniques calm the body down and bring it into a more relaxed state,” Dr. Young explains. “This kind of breathing can help us focus our mind and our body away from worries and repetitive thoughts.”
She goes deeper into what this breathing technique can do for you.
Calm your mind The repetitive nature of 4-7-8 breathing provides a calming distraction to your racing mind. “The counting sequence is a way to focus your mind on something other than your worries,” Dr. Young says.
Reduce stress and anxiety Your sympathetic nervous system is responsible for your body’s “fight-or-flight” response. When you’re stressed, this system goes into overdrive, which makes you feel amped-up — like a fast-beating heart, shallow breathing and other telltale signs of stress, like sweaty hands and an upset stomach.
Your parasympathetic nervous system is responsible for relaxing your sympathetic nervous system and helping you calm down. “Breathing techniques like 4-7-8 breathing can play a huge role in activating your parasympathetic nervous system and helping you to shift back toward tranquility,” Dr. Young says.
Help you sleep Forget counting sheep and skip right to counting your breath. Calming your mind and reducing your anxiety can go a long way toward a good night’s sleep, and 4-7-8 breathing is associated with both. It’s also been shown to decrease heart rate and blood pressure, which put your body in the right state for sleep.
Train your body to better respond to stress They say you can’t teach an old dog new tricks, but with practice and repetition, you can teach your nervous system to do some pretty cool things.
“It takes some time for the nervous system to respond to this type of breathwork,” Dr. Young says. “The more we do it, the more we allow our bodies to go into that parasympathetic mode.”
If you regularly practice 4-7-8 breathing (especially during times when you’re not particularly stressed), your body will actually learn to incorporate it into your go-to stress response.
How to do 4-7-8 breathing You can do this practice in any position, though Dr. Weil recommends sitting up with your back straight. If you’re using 4-7-8 breathing to help you fall asleep, though, you can even do it while lying in bed.
Here’s how to do it:
Position your tongue. Throughout this breathing technique, your tongue should stay toward the roof of the mouth, with the tip of your tongue touching the back of your two front teeth [no, keep your tongue passive
as directed by Mr. Iyengar in Light on Prāṇāyāma]*.
Breathe out deeply. “With any breathing technique, it’s ideal to start with an exhale,” Dr. Young says. Let your breath out through your lips, making a whooshing sound [no, breathe through the nose as directed by Mr. Iyengar in Light on Prāṇāyāma]*. Now you’re ready to begin counting .
Inhale and count to four. Breathe in through your nose while mentally counting up to four. Don’t go too slowly or too quickly; pick a pace that works for you.
Hold and count to seven. Without straining or stressing, gently hold your breath while counting to seven in your mind [regard it as a pause, not a ‘holding’].
Exhale and count to eight. Breathe out slowly for eight counts, with your lips slightly pursed around your tongue. “You should hear that whooshing sound,” Dr. Young says. Congrats! You’ve now completed one cycle of 4-7-8 breathing [exhale through the nose, as directed by Mr. Iyengar in Light on Prāṇāyāma].
Repeat the process. Do steps three through five again for three more cycles: Inhale through your nose for four counts; hold your breath for seven counts [Regard it as a pause, not as a ‘holding’]; exhale through your mouth for eight counts [exhale through the nose, as directed by Mr. Iyengar in Light on Prāṇāyāma].
Dr. Young warns that when you’re first starting out learning 4-7-8 breathing, you may experience a little bit of lightheadedness or shortness of breath. But this is just a function of learning to breathe more slowly.
“So, many of us just aren’t used to focusing on our breathing,” she says. With a little bit of practice, your body will soon adjust.
Tips for 4-7-8 breathing Although 4-7-8 breathing is a fairly simple, straightforward technique, it’s a powerful one that can pay off big for your mind, body and spirit. Dr. Young shares some additional insight into making it work for you.
Fine-tune your practice In the beginning, don’t put pressure on yourself to go at a snail’s pace. No one expects you to master your breath on the first try (or even the second or the third or the 20th), so allow yourself to go at whatever pace feels right for your skill level.
As you become more skilled at 4-7-8 breathing, you’ll be able to slow things down for deeper relaxation benefits. “The counting and the ratio of your breath will stay the same, but you can readjust the pace to your comfort,” Dr. Young notes.
Do it twice a day Practice makes progress! The more you do 4-7-8 breathing, the better at it you’ll become, and the more your body will begin to incorporate it into your stress response. Dr. Young suggests doing three cycles of this breathing technique twice a day. “You’re going to see results really quickly,” she says.
Make it a habit Identify two recurring moments during your day that you can designate for practicing 4-7-8 breathing. Whether you do it when you wake up, after you get off work or right before you get in bed, setting a time for it can help you to stick with it and adopt it as an ongoing practice.
“Getting into a habit at certain times of the day makes it easier to stay with it,” Dr. Young says. “It doesn’t matter when you do it; it just matters that you actually practice it.”
To hear more on this topic, listen to the Health Essentials Podcast episode, Breathwork for Beginners. New episodes of the Health Essentials Podcast publish every Wednesday.
* Mr. Iyengar writes in Light on Prāṇāyāma, #32 of Cautions and Hints: “Saliva flows at the beginning of prāṇāyāma. Swallow after breathing out, but before breathing in, and never while holding the breath. Do not stiffen or press the tongue against the teeth and palate, but keep it and the throat passive.”
** Mr. Iyengar writes in Light on Prāṇāyāma, #5 of Cautions and Hints: “Breathing in prāṇāyāma should always be through the nose, except where otherwise stated as in Ch. 24.” However, this chapter describes inhaling through on open mouth for Śītalī and Śītakārī prāṇāyāmawith the tongue curled. Exhalation remains through the nose.
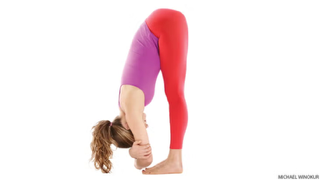
If you’re having difficulty with forward bends, don’t assume it’s your hamstrings. Inflexible rotator muscles may be to blame.
Judith Hanson Lasater Yoga Journal Aug 28, 2007
There is an old Sufi story about philosopher-fool Nasrudin, who was looking for his house keys under a street light. A couple of friends happened by and joined in the search. Finally, in exasperation, one of the friends asked Nasrudin where he thought he had lost the keys. Nasrudin pointed to a spot some distance away where it was extremely dark. But why are we looking here then? he was asked. He replied: Because it is so much easier to see under the light.
This story reveals a common human tendency: to look where we want to instead of digging deeper to reveal the root of a problem. This is true of some yoga students who are trying to move deeper into their forward bends.
You attend class regularly, sometimes for years, practice at home, and make progress in most poses—except for forward bending. You seem to have hamstrings of steel! No matter how often or how long you practice, there doesn’t seem to be any change. One day while teaching, I realized that I was like Nasrudin. I was looking in the wrong place to find a solution for some students who, no matter how often or how long they practiced, did not experience any change in forward bending poses. I realized that, like the hamstrings, a group of muscles in the hip area—the external rotators—can interfere with the ability to bend forward.
While each of these muscles is a separate structure, they function as one, working to externally rotate the femur (thighbone), stabilize the pelvis during walking, and help stabilize the pelvis and the femur together when you are standing on one leg. When you bend forward, all of the muscles on the back side of your body must lengthen, including the rotators.
An especially important rotator is the piriformis, which attaches to the sacrum and to the femur; the sciatic nerve passes directly under this muscle. A tight piriformis can do more than just limit your forward bends.
Folding Through Troubling Tight Rotator When a tight piriformis presses down on the sciatic nerve, it can lead to ‘piriformis syndrome,’ which creates a radiating pain in the buttocks, down the back of the thigh, into the leg and foot.
And if this rotator is especially tight, it can pull on the sacrum, affecting the functioning of the sacroiliac joint (the joint between the sacrum and the pelvis). When the sacroiliac joint is dysfunctional, the lumbar (lower) spine can also be adversely affected.
So if your forward bends are limited, or if you’re experiencing ‘piriformis syndrome,’ it’s a good idea to continue to work on the hamstrings, but also include a few rotator stretches in your regular asana routine.
A note of caution: If the leg pain is great and/or persists, it is advisable to seek the treatment of a qualified health professional.
Walk the Walk for Flexibility Walking has a phase called the swing phase in which you are, in effect, standing on one leg: One leg is the support leg and the other is swinging forward but has not yet touched down. Because gravity tends to pull down on the pelvis, we need the action of the rotators on the standing leg side to hold the head of the femur and the pelvis together in a stable position. Rotators tend to get tight when this action is exaggerated, like when you run or dance.
In order to understand this concept, try an experiment. Place your fingertips on the front of your pelvis, slightly to the side of the bony prominence called the ASIS (anterior superior iliac spine). Walk across the room and notice how these bony landmarks are held virtually level in relationship to the floor—this is because the rotators are holding the pelvis stable while you’re walking.
Now, keeping the hands as they are, raise the right leg in front of you as if you are about to take a step. Allow the left hip to sway to the left. The pelvis is now tipped downward on the right as the right rotators are relaxed. Place the right foot on the floor and try this experiment on the other side.
Dancers and Prancers Beware Dancers and runners usually have tight rotators because they demand increased stability from these muscles. Dancers, for example, need stable rotators when standing on one leg and lifting the other leg up in an arabesque. They might be quite flexible in other ways, but often have tight rotators.
For runners, the increased momentum associated with the forward movement of the legs places greater demands on the rotators to hold the pelvis level.
Try this: Stand up and place the feet a foot or so apart with the feet turned out as in second position in ballet. In order to turn the feet out when standing, you contract your external rotators to rotate the femur. If you hold them in this externally rotated position as if they are tight, you will see how that interferes with forward bending. Hold the buttocks firm by squeezing them together; try to bend forward. Even if you are supple, this will be difficult. If, on the other hand, you turn the thighs inward, stretching as opposed to contracting the rotators, this will facilitate forward bending.
Now turn the toes and thighs inward as much as possible. Imagine that you are pressing outward with the heels but actually keep the feet still as you bend. It will be much easier to bend forward with the legs and feet in this position. This is because the external rotators are being stretched and thus are interfering less with the forward movement of the pelvis over the thigh bones.
Practice Makes Perfect in These Five Rotator Stretches The five rotator stretches presented below are in order of increasing difficulty. The benefits they bring to other poses, such as uttānāsana (Standing Forward Bend), as well as to ease of walking, make them worth doing frequently. Because these poses can be deep stretches even for experienced students, attempt them when you are already warmed up by your regular yoga practice or some other physical activity. And remember: Recent research in muscle physiology has found that stretches need to be held for at least one minute in order to be effective. You may feel some of these stretches more on one side than the other. In fact, the longer you practice yoga, the more aware you will be of the differences between your right and left side. You may want to stretch the tighter side longer.
After each stretch, walk around the room to relax the rotators. You may discover that walking is easier as the rotators loosen. Try practicing a forward bend to see how it has changed. You may also notice that your Padmāsana (Lotus Pose) improves. Hopefully such observations will encourage you to make these poses part of your regular asana practice.
5 Rotator Stretches:
1. Reclining Twist
Lie on your back and bend the knees so that the feet rest on the floor. Inhale. As you exhale, bring the knees slowly to the chest one by one so that the lower back remains firmly on the floor. Squeeze your knees together and drop them to the left, keeping your shoulders on the floor. The legs should be approximately at a 90 degree angle to the body, but experiment to find the position that maximizes the stretch in your outer hips (especially the right one). As you stay in the pose, imagine that the belly is rotating in the opposite direction from the legs. Repeat on the other side.
2. Reclining Twist With Raised Knee
Lie on your back with your knees bent and your feet on the floor. Cross your right ankle over your left knee. Inhale. As you exhale, drop the legs to the left, bringing your right foot to the floor and keeping your shoulders on the floor. To increase the stretch, gently push your right knee away from you with your left hand. This should intensify the stretch in the outer right hip. If you don’t feel this stretch, experiment with the placement of your right foot; you may need to bring it closer to the hip or move it farther toward the knee on the floor. Repeat on the left side.
3. Standing Pigeon Pose
Place a blanket along the end of a stable, waist-high table. Lift your left lower leg onto the table with the knee bent; the shin and thigh should form a 90 degree angle. Keep the shin parallel with the far end of the table. Ideally, both your foot and knee should be resting on the table. If you find this too difficult, try a shorter table. You should feel the stretch in the outer hip and buttock of the left leg. If you are not feeling much of a stretch, bend forward as you exhale, making sure you don’t move your standing leg and knee. It is important that the forward bend comes from the hip joints. If you move from the hip joints, you should not feel a strong stretch in your back. If you bend from the spine, you will stress the lower back-and won’t stretch the rotators. You can further augment the stretch of this position by moving the supporting leg away from the table or moving the foot on the table away from your body. Repeat with the right leg on the table.
4. Modified Pigeon Pose
Start in Downward-Facing Dog (adhomukha śvānāsana). Step the right foot forward between the hands so that you are in a lunge position. Rest the left knee on the floor. Move your right foot so that it is exactly in the middle of your hands. Make sure that the right shin is perpendicular to the ground. As you exhale, let the right knee drop out to the right side. You will need to move your right arm out of the way. Place it where you need it for balance and then move your left leg and torso backward so that you actually open up the angle of the right knee; you will move your body slightly backward as you do this. It is important to keep the right foot slightly flexed so that you are putting weight on the outside rim of your foot and not your ankle.
Some students will be able to bring the left thigh and right buttock all the way to the floor, as in the splits. Use bolsters or blankets for support if you can’t reach the floor. As you allow the body to drop down, keep the middle of the pubic bone exactly in line with the right heel.
Most students, when they feel the deep stretch in the right rotators in this pose, will shift the pelvis to the right. It is better to keep the body a little higher and toward the left than to shift the pelvis off to the right side. After several breaths, repeat this pose on the left side.
5. Twisting Lunge
Start in Downward-Facing Dog. Step the left foot forward between the hands so that you are in a lunge position. Rest the right knee on the floor. Make sure that the left shin is exactly vertical. Place the right forearm down on the floor and place the right palm over the instep of the left foot.
Gradually let your body weight down onto your forearm. With your left upper arm on the outside of your left thigh and your left hand on your shin, hug your left leg toward your heart so that the chest drops down and you turn your breastbone toward the inside of the left leg. (Your hips will not be square in this position.) Keep the left shin vertical and the left foot flat on the floor. Repeat on the other side.
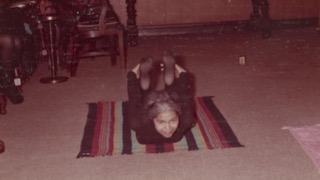
If you look closely, you can see a twinkle in her eye.
The Library of Congress image, taken in Detroit in March 1973, shows the late civil rights leader Rosa Parks engaged in the holistic practice of yogāsana, lying on her stomach and pulling her feet toward her head while looking up toward the camera.
The move, called bow pose or dhanurāsana, is associated with fearlessness and grace, and involves reaching back with your hands to grab your ankles, then extending your chest and thighs upward, opening to the world.
The image serves as evidence that Parks, who was born in 1913 and lived to 92, was a true yogi.
“The fact that she did yogāsana does not at all contradict the other things that I know about her,” said Brenna Greer, associate professor of history at Wellesley College who has studied the life of Parks.
“She was often taking care of herself,” Greer said, which contributed to her strength.
The twinkle in Parks’ eye makes it sobering to remember that almost two decades before the date of that photo, in December 1955, she was arrested at age 42 in Montgomery, Alabama, for refusing to give up her seat on a city bus to a white passenger.
The way Parks took a stand for civil rights reflects many of the principles behind yoga that connect the body and the mind, such as satya, a practice of truthfulness intended to guide people to think, speak and act with integrity, said Stuart Sarbacker, professor of comparative religion and Indian philosophy at Oregon State University, who has studied the history of yoga.
“Yoga can be defined as mind-body discipline, and it’s rooted in the idea that when you discipline your mind and body, they become very powerful, and then that becomes the basis for having a more skillful and more impactful agency in the world,” Sarbacker said.
“Part of my thinking about Rosa Parks is that this was a very impassioned person who wasn’t tired. She was really fed up. That’swhat she was,” he said. “But she was very disciplined in her approach.”
Parks famously has said that she did not refuse to give up her seat on the Montgomery bus because she was physically weak or had tired feet.
“The only tired I was, was tired of giving in,” she once said.
Before her arrest, Parks was active in the Montgomery branch of the NAACP, even becoming its secretary, and in the summer of 1955 she attended a series of workshops on desegregation, including discussions on the use of nonviolent resistance to oppose segregation.
“There’s a real strength behind what she stands for,” Greer said. “More so than most, we have a really limited and, I think, inaccurate image and understanding of this person whose history can be so informative and valuable to us — if we allow ourselves to have it.”
He made a ‘big splash’ with his spiritual vision of yoga as a “universal practice that was India’s gift to the world,” Sarbacker said.
In the early 20th century, yoga grew in popularity specifically among women. British social activist Annie Besant wrote the book “An Introduction to Yoga” as a collection of four lectures she gave on the practice in 1907.
“Between the 1920s and 1950s, the physical aspect of yoga was brought to the fore, being marketed toward women as a way to achieve health and beauty,” Sarbacker said.
It was around this time thatParks was likely introduced to yoga.
Parks was born in Tuskegee, Alabama, and “she talks about how her mother really impressed on them the importance of health and being outside and stretching,” Greer said, adding that the civil rights activist had chronic tonsillitis as a child that often waylaid her.
Parks practiced daily stretching and exercise routines, which her mother taught her, according to historian Stephanie Evans.
“Her first exposure to daily exercise actually came from her mother, who was a teacher in Alabama,” said Evans, a professor of Black women’s studiesat Georgia State University, national director of the Association of Black Women Historians and author of the book “Black Women’s Yoga History: Memoirs of Inner Peace,” in an email.
“When the school near their home closed, Rosa and her brother Sylvester still benefited from the diverse lessons their mother offered, and she was their teacher until Rosa was eleven.”
By the time Parks was an adult, yoga had grown in popularity among movie stars and artists. Around this time, a yoga teacher named Indra Devi helped make the practice popular among celebrities, Sarbacker said.
“In the ’50s, she taught Hollywood celebrities, really bringing yoga into the cultural mainstream of the United States. And I think that too helped really popularize yoga,” he said. “We still see echoes of this in terms of the relationship between yoga and celebrity culture.”
By the late 1950s, several stars in Black Hollywood — including singer and actress Eartha Kitt and singer and actor Herb Jeffries — practiced yoga.
Parks was not only taking yoga by this time, but she was also teaching the practice, Evans said.
Parks moved to Detroit in 1957, and her niece Sheila McCauley Keys and nephew Asheber Macharia have recounted in writings how their aunt accompanied them to yoga classes and cultivated her own private practice.
Then in 1964, Parks became a deaconess in the African Methodist Episcopal Church. It was a time when there was a link between the Civil Rights Movement, Black churches and Mahatma Gandhi’s philosophy of satyagraha or “the seizing on to the truth,” Sarbacker said, referring to the concept of resistance that has ties to the yoga philosophy of satya. Gandhi’s approach directly influenced the Rev. Martin Luther King Jr., one of the most prominent leaders of the Civil Rights Movement.
“The efforts of the Civil Rights Movementdidn’t happen by accident,” Sarbacker said. “It was driven by people who cared deeply about the causes that they were invested in and went to lengths to train their bodies and their minds to be up to the task of effecting change in the world.”
‘Mindful and purposeful’
Yoga remained a prominent part of Parks’ life and activism. She died in 2005 in Detroit.
“Parks was mindful and purposeful in her public presentation of peace work. For example, the legacy of yoga continued in the Rosa and Raymond Parks Institute (for Self-Development), which was established in 1987 in Detroit,” Evans said in her email.
“Their signature programs, developed by Mrs. Parks and her longtime friend Elaine Steele, included civil rights history education, advocacy training, and building life skills,” she said. “Exercise is woven into the fabric of the five-week course for youth, and participants are exposed to yoga, as well as karate and other activities.”
There are also many lessons on self-care, communal care and stress management — especially for the Black community — woven into the history of Parks and her yoga practice, Evans said.
Parks’ example of mind-body health not only supports self-care but alsothe importance of community care.
“The stress of people living in America is at an all-time high,” Evans said.
“Systemic solutions must be put in place in addition to a focus on personal healing. It is not enough for an individual to ‘work hard’ to overcome systems of oppression. Changing the system requires a collective effort to address how those systems were built and kept in place,” she said. “Practices like yoga give individuals and communities the focus and energy to work together and make necessary changes.”
While Greer is inspired by how Parks prioritized self-care and personal healing by practicing yoga, she said she worries about how the message of self-care may take away from the importance of having others contribute to a person’s care and well-being.
“I’m always conscious of how self-care absolves others from caring for us,” Greer said.
“I really appreciate this idea that mental wellness and physical health, for Black women in particular, is radical. For us to take charge of that, it’s radical, because others aren’t. We’re neglected in that way by society at large,” Greer said. “Nobody says to men, ‘Are you practicing self-care?’ So, at the same time that we are committing ourselves to it, and learning and making the time to take care of ourselves, we should not stop expecting it as just a right — and it’s something that we should be able to expect from others.”
Correction: An earlier version of this story had the wrong date for the Rosa Parks’ Library of Congress image. It was taken in March 1973.