Save Your Neck

by Julie Gudmestad, Yoga Journal, July/August 2001

Practiced with careful alignment, yoga poses can help alleviate past neck problems and prevent future ones.

JUDGING FROM THE COMPLAINTS OF my physical therapy clients, chronic neck tension is a modern American epidemic. Even the more benign consequences – the painful crick in your neck, the dull headache radiating from the back of your skull – can be mighty annoying. The more serious ones, like pinched nerves, arthritis, and damaged discs, can be debilitating.

Fortunately, yoga can do wonders for neck problems while simultaneously teaching safer, healthier posture habits. But some of the poses that can help you, like Śīrṣāsana (Headstand) and Sarvāṅgāsana (Shoulderstand), can also do harm if performed incorrectly. It’s important to approach them with knowledge of proper alignment.

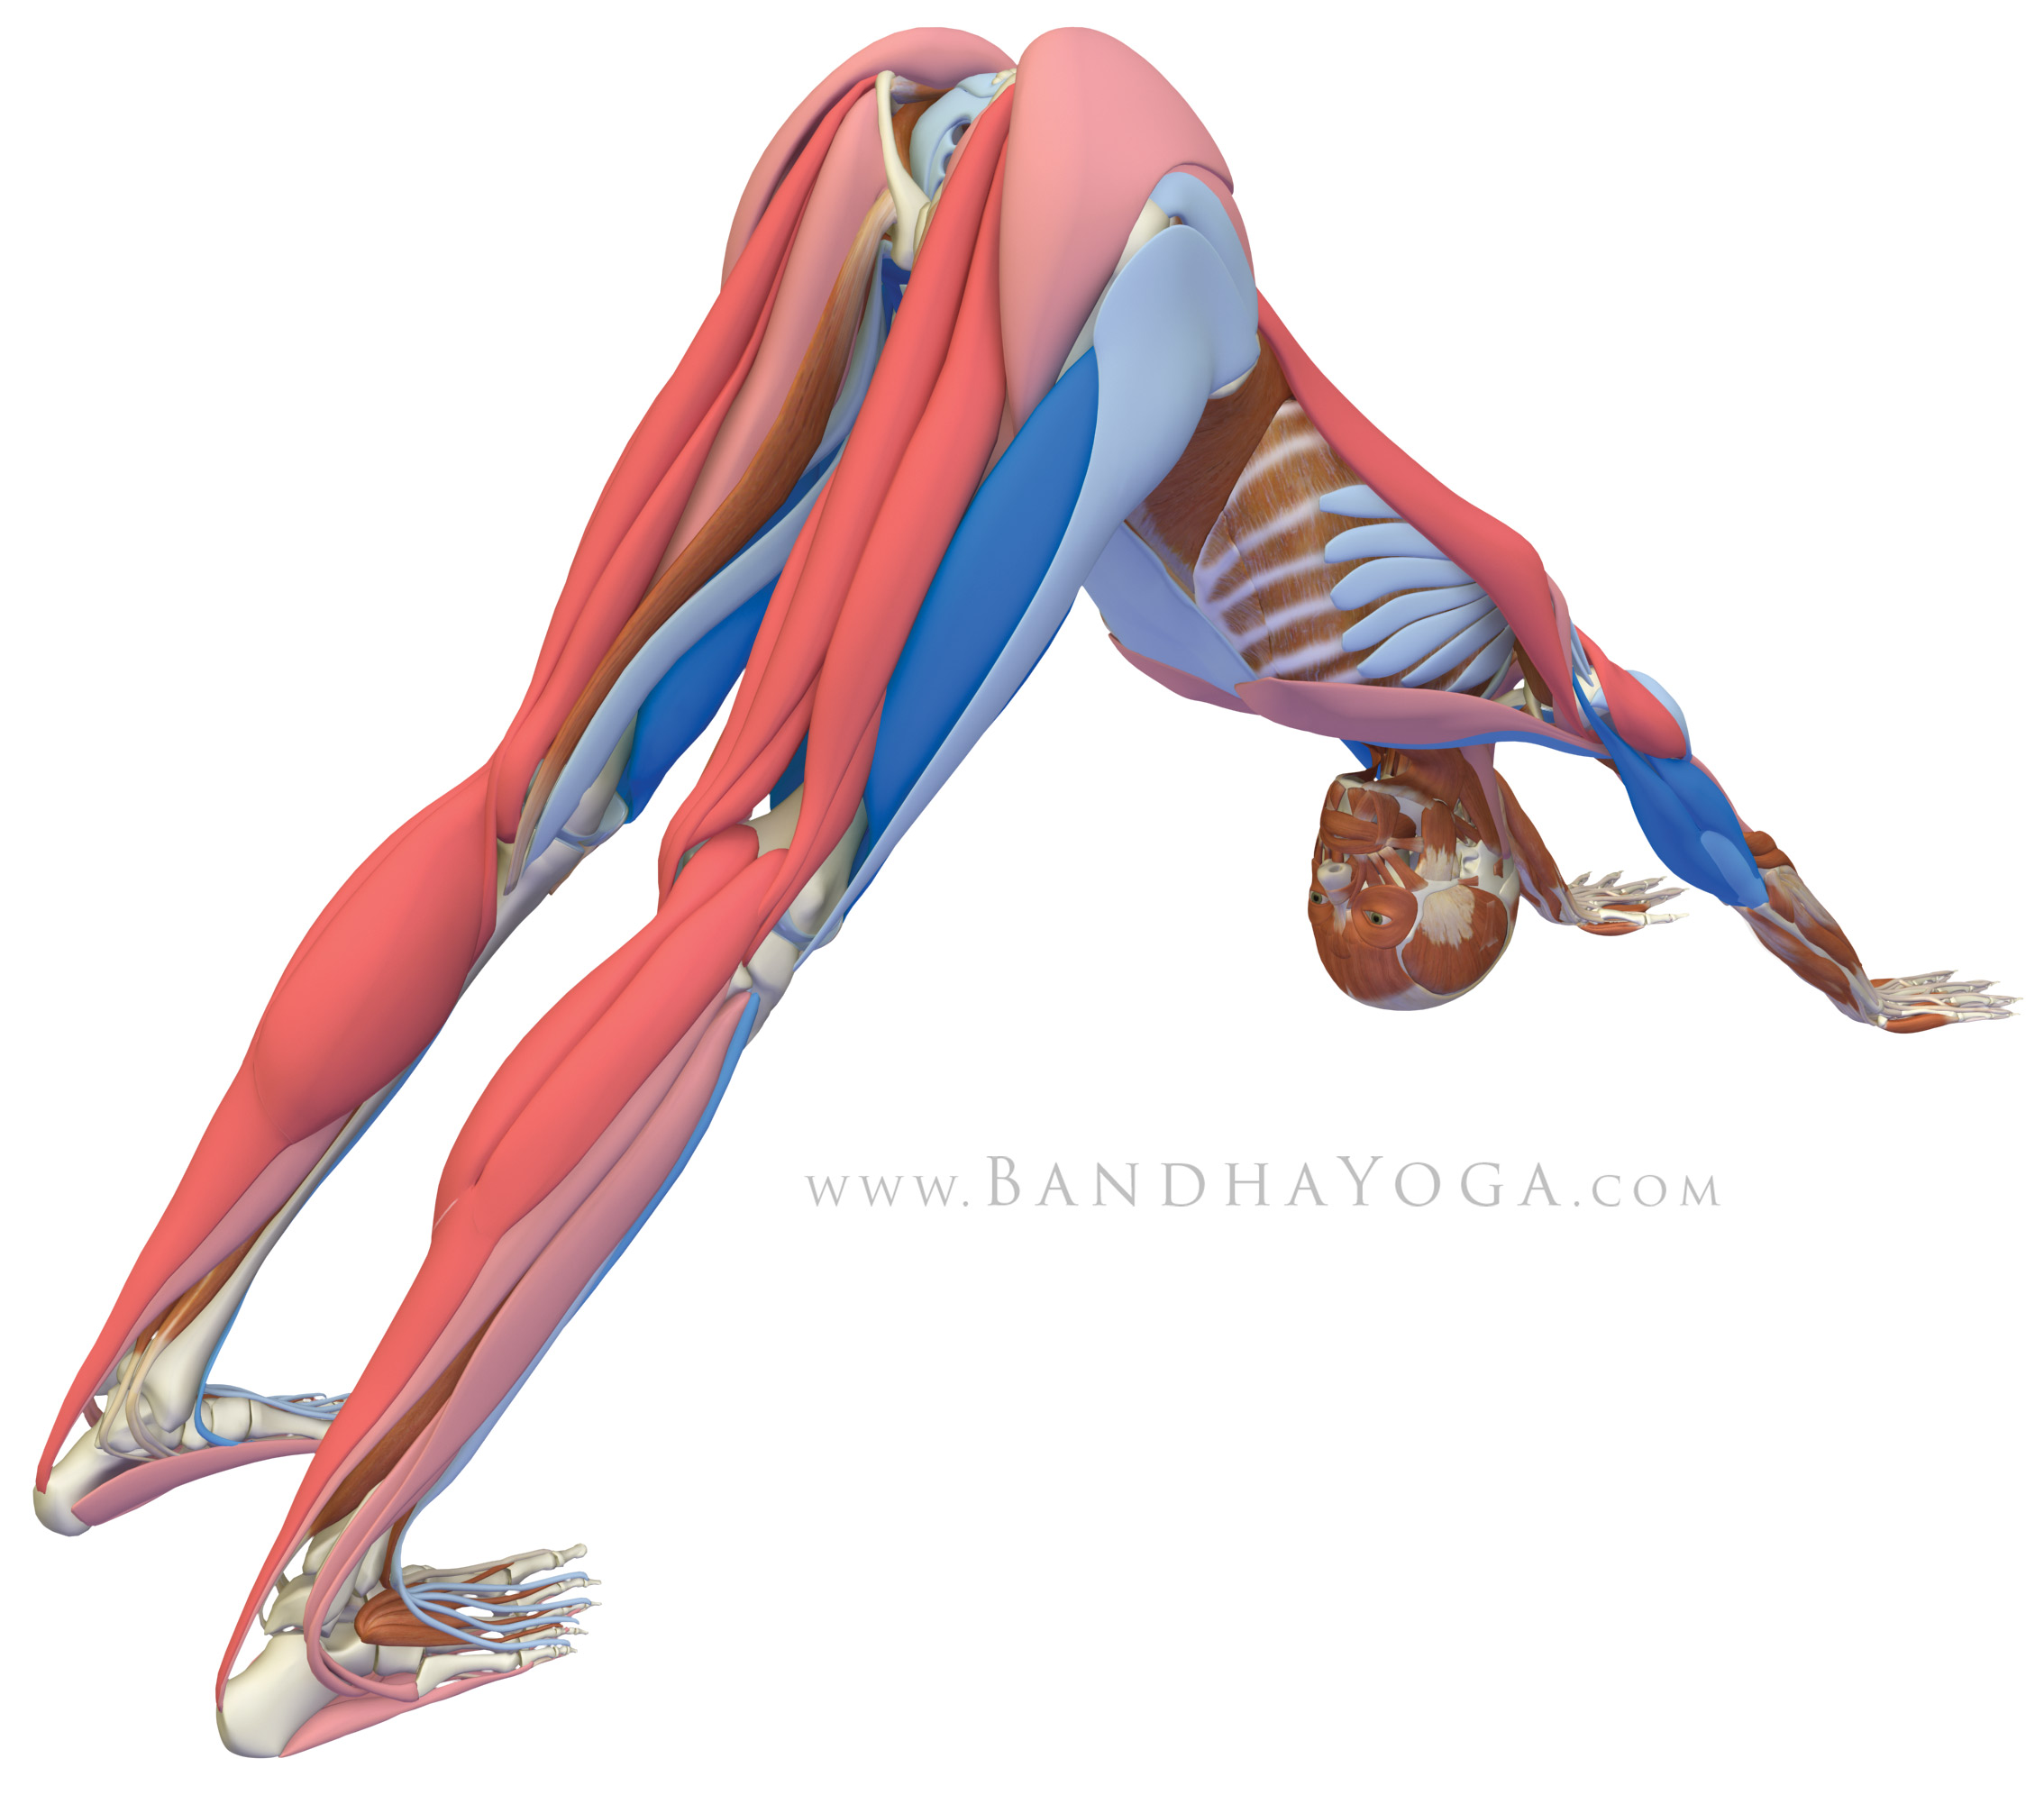
Let’s take a look at the muscles of the back of the neck. Why do they cause so much trouble, and how can we use yoga to help them function better? The primary muscles of the back of the neck are the levator scapulae [above], which extend from the cervical (neck) vertebrae to each inner upper scapula (shoulder blade). Lying on top of the levators and also inserting on the shoulder blades are the upper trapezius muscles [below- orange], which originate on the base of the skull and the neck vertebrae. Together, these muscles lift the scapula and backbend the neck. The levators and trapezius muscles also help to turn the head and sidebend the neck.

The stress of a busy lifestyle with deadlines, difficult people, and lack of sleep certainly tightens neck and jaw muscles. A forward head posture is also a factor for many people. An average head weighs 12 to 15 pounds, when that weight sits forward of the central line of the spine, the muscles on the back of the neck have to work very hard to hold the head up against the pull of gravity.

Whether due to stress or poor head-neck alignment, chronic tightness in the levator scapulae and the upper trapezius can lead to significant neck pain. As the muscles pull down on the base of the skull and upper neck, they also pull up on the scapula. All this adds up to compression on the cervical vertebra. Such tightness and compression can lead to arthritis, cause nerve pressure that makes pain radiate down the arm, and increase the likelihood of neck muscle injuries.

Do no harm
JUST AS IN MEDICINE, a key rule in haṭha yoga is “First, do no harm.” It’s crucial to avoid common yoga mistakes that can result in neck injury. If you come to yoga after years of neck tension, the muscles at the back of your neck will probably be quite short and tight, limiting your ability to bring your head toward your chest. Since you need a great deal of this neck flexion to do Shoulderstand, forcing a tight neck into the pose can strain the muscles and ligaments. Even worse, forced flexion can cause cervical vertebrae discs to bulge or herniated, serious injuries that may take many months to heal.

Many people habitually tighten their neck and shoulder muscles when they concentrate, and it’s easy to carry that habit over into yoga. This can be especially true in backbends. Students tend to overcontract the neck, sticking the chin out and up and compressing the back of the neck. This action can result in an unpleasant headache after backbends such as Bhujāngāsana (Cobra), Śalabhāsana (Locust), and Ūrdhva dhanurāsana (Upward-facing bow).

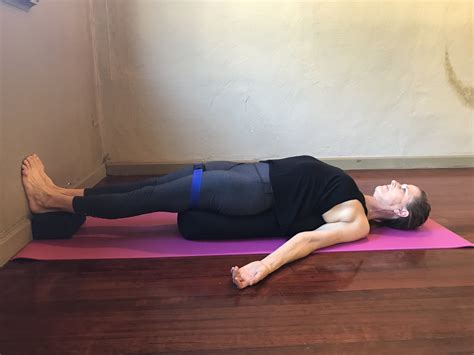
Fortunately, one backbend actually lengthens the back of the neck. Doing Setubandha (Bridge pose) supported on bolsters for a few minutes three or four times a week can help prepare you for Shoulderstand.

Decompress your neck
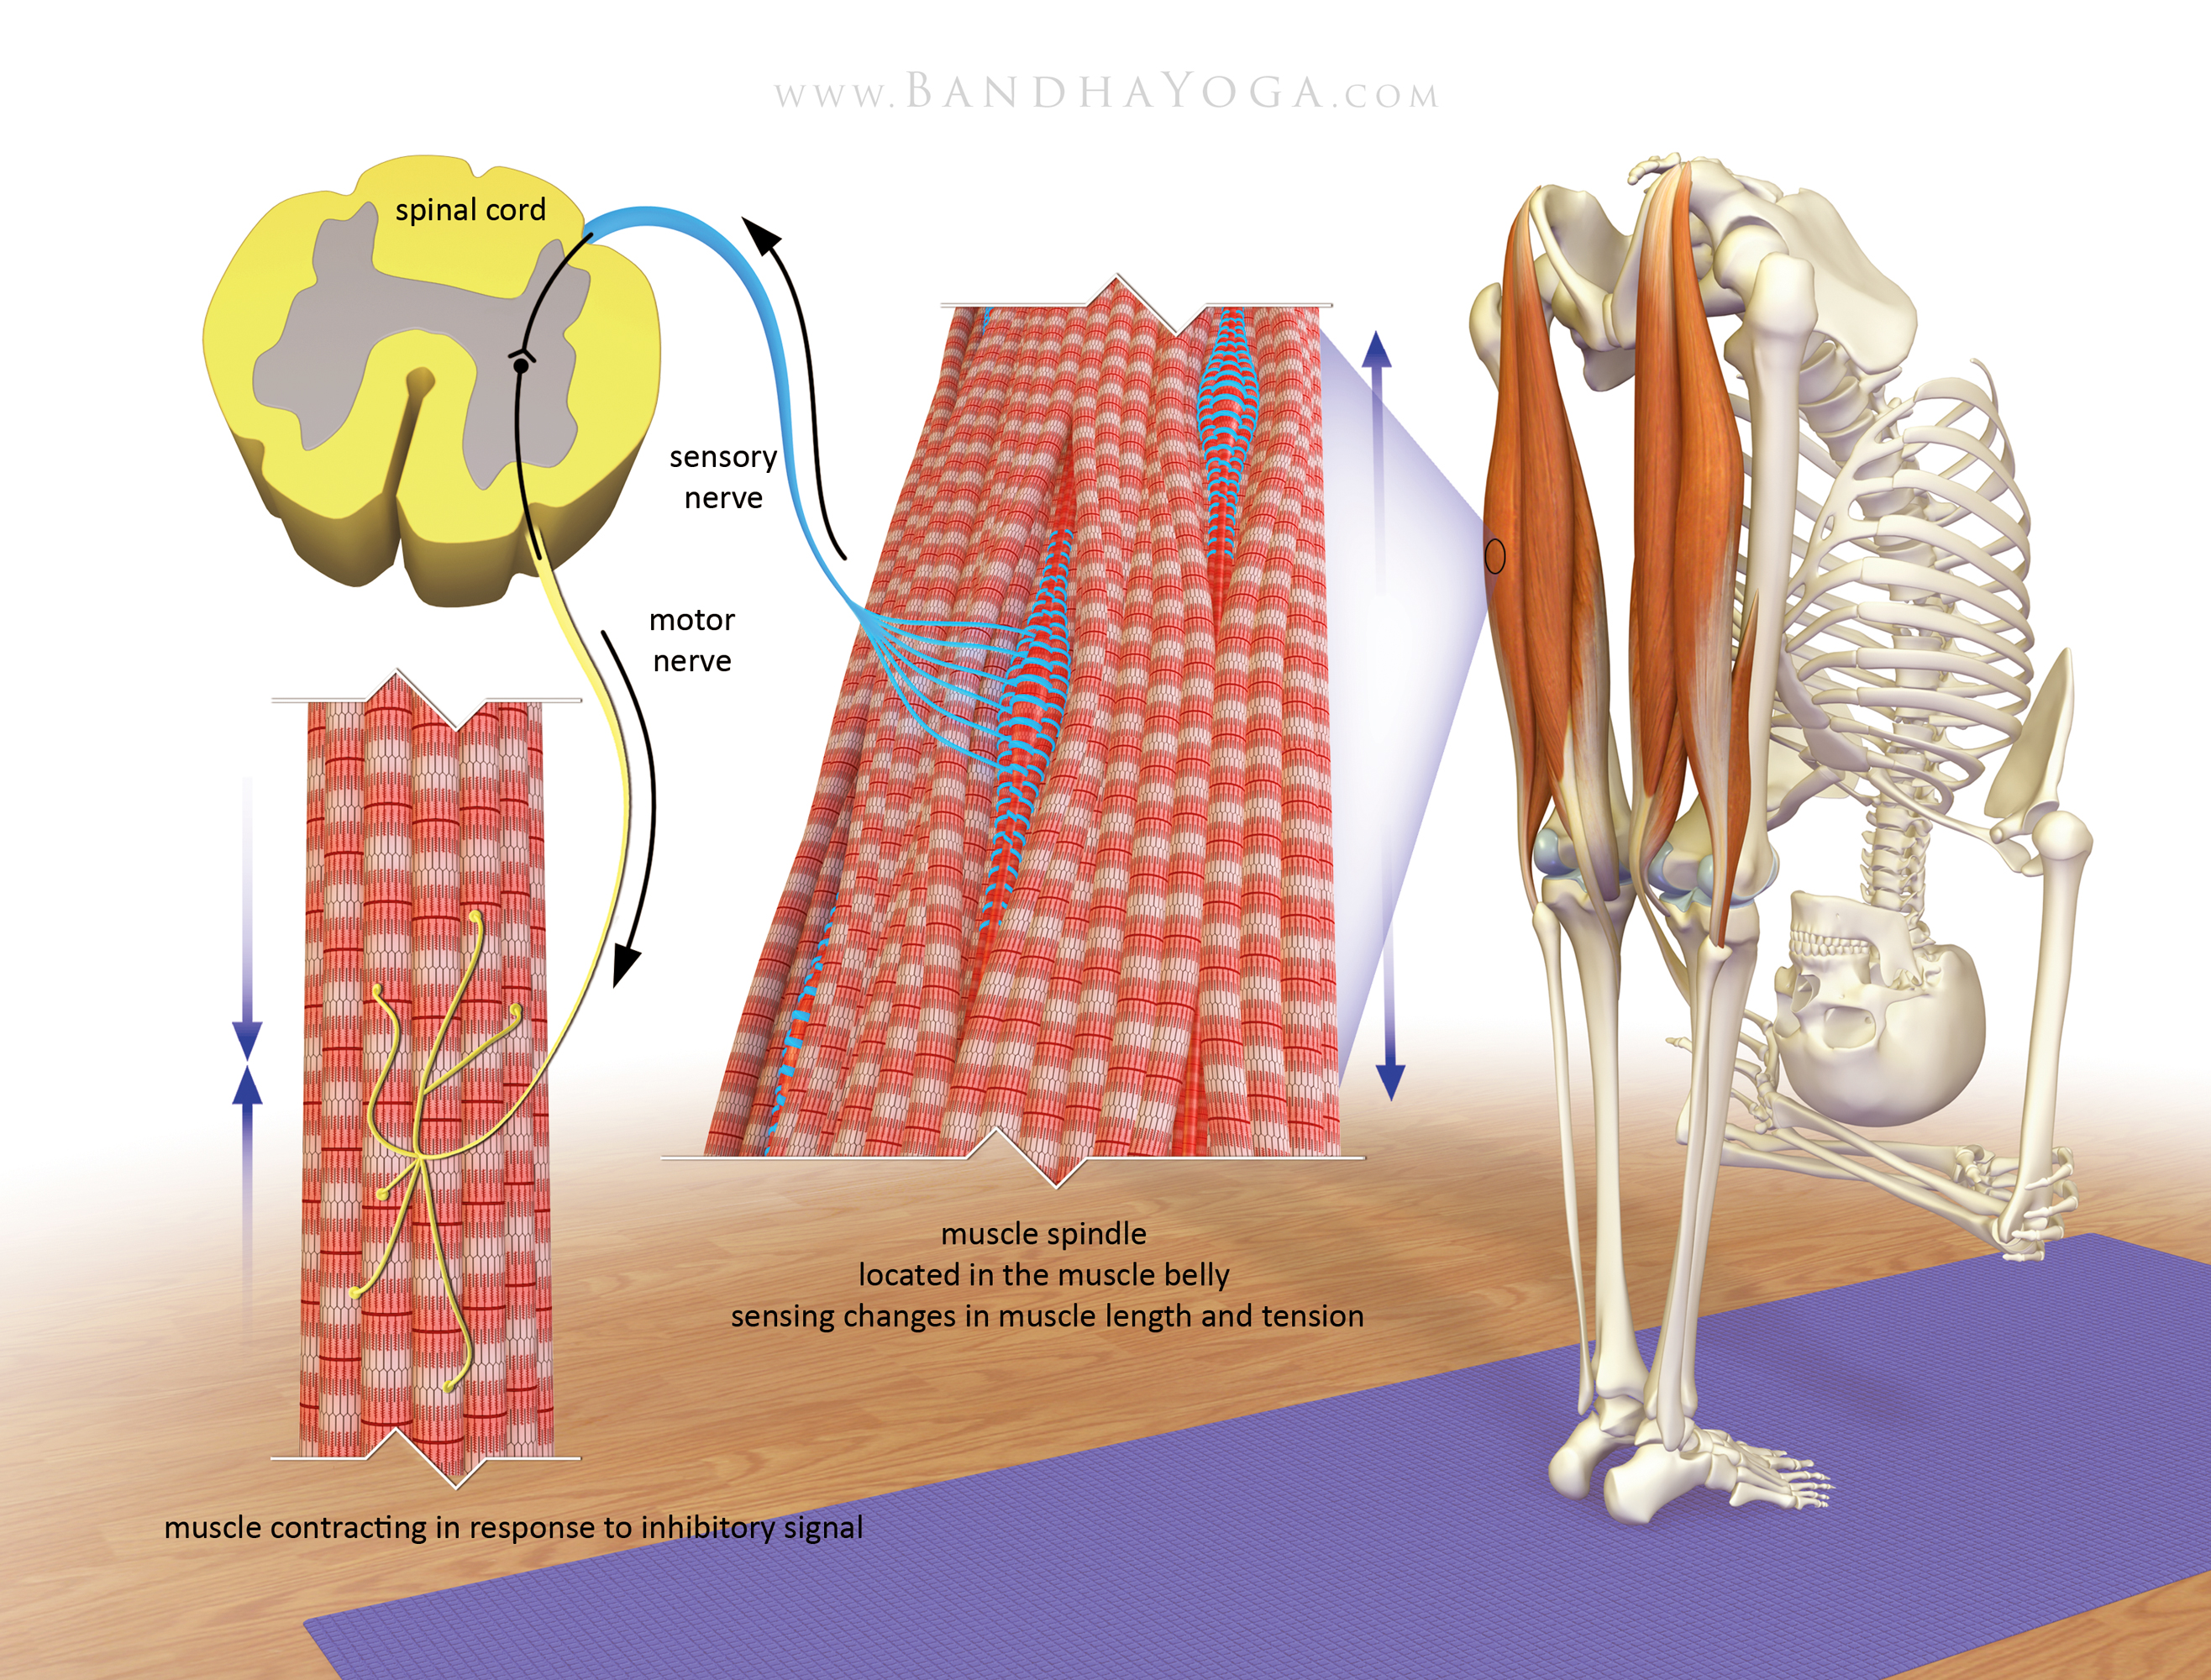
IT’S HELPFUL TO LEARN HOW TO relax, lengthen, and decompress your neck before you try to do it in a pose. Here’s a simple exercise to prepare you for keeping your shoulders down and neck relaxed in yoga poses. Hold an object weighing one to two pounds in each hand, letting the weight of the objects pull the shoulder blades down. Make sure that you keep the breastbone lifting up so that the tops of the shoulders don’t pull down and forward, collapsing the chest. Now set the objects down and see if you can find the muscles you need to pull your shoulder blades down just as the weights did.

These muscles are called the lower trapezius [second skeleton- plumb] . They attach to the vertebrae of the midback and insert on the inner border of the shoulder blades. They are the antagonist muscles to the upper trapezius (traps)– in other words, they perform the opposite action – and are very important posture muscles, helping support the spine in the midback. Unfortunately, when the lower traps are too weak to counteract the pull of the stronger and tighter upper traps, the scapulae will tend to ride up, compressing your neck.

Now let’s take these lessons and apply them in an āsana. Stand with your legs ready for Vīrabhadrāsana II (Warrior II). Lift your breastbone up and pull the scapula down: This action requires release and lengthening in the upper traps and contraction and firmness in the lower traps. Next, lift your arms out to the sides to shoulder height, turning your palms up. Feel how turning the palms up helps bring the shoulders down and activates the lower traps. Keeping that action and position of the shoulder blades, turn the palms back down; you now have the correct shoulder and arm position for Warrior II and many of the other standing poses.

It is also important to incorporate this action into Headstand, so that you can protect your neck from compression. When you’re upside down, gravity pulls the shoulders toward the ears, so you need extra awareness and strength in the lower traps. While in Headstand, have a helper put a finger on each shoulder blade at the base of the neck and gently draw the fingers away from the floor, lifting your scapulae toward your hips. At first you may get disoriented while upside down, but once you’ve felt the proper direction of lift, you should find it easier to engage your lower traps.

Before you begin working on Headstand, you should probably spend at least several months working on a variety of other poses to strengthen your back and neck muscles and improve the alignment of your spine. It’s also a good idea to be strong in all of the arm and shoulder muscles before trying Headstand. The small cervical vertebrae are designed to support only the weight of the head, but when we do Headstand, they are supporting nearly the full weight of your body. Unless you have developed enough strength in the arm and shoulder muscles to take a little of the weight off your head and to balance the body if is shifts around slightly in Headstand, you can injure your neck. Work often on Adhomukha śvānāsana (Downward-facing dog) and Handstand to build the strength and endurance that will help prepare you for a safer Headstand.

One final thought about Headstand: A normally curved neck will bear the weight of Headstand much more easily and safely than an overly curved or overly flattened neck. To check your own neck curve, stand in front of a mirror. With a normal curve, your chin should be level and you should be looking into your own eyes in the mirror. Put several fingers of one hand across the back of the neck. The tissues there should feel soft, and the neck should curve slightly forward. Now drop your chin and feel how the tissues become hard and the curve flattens. Then lift the chin and feel how the back of the neck compresses. In Headstand, if your head contacts the floor toward the forehead, your neck curve increases and the back of the neck compresses. If your contact point is toward the back of the head, your neck flattens. When you do Headstand, make sure you are centered on the very middle of your head. Look in a mirror while you’re in Headstand – or have a teacher look at you – and make sure that your eyes look straight ahead, your neck curve is normal, and the back of your neck is soft.

Practicing yoga poses with conscious awareness of your head, neck, and shoulder alignment will help you gradually break the habit of chronic neck tension. The benefits to your health and well-being will be many – and you probably won’t be seeking an appointment with me for a yoga-related neck injury.

BEGINNER’S MIND

During āsana practice, we are not only training the body to do the physical poses, but we are also training the mind to be present. It is the nature of the mind to wander: our attention is easily drawn to sounds, thoughts, memories, and worries. By paying attention to the teacher’s cues, we are bringing the mind into the pose and into the current moment as we learn to straighten a knee, rotate a shoulder or stretch the fingers.

We can also develop focus by coming into our practice with ‘Beginner’s Mind’, in which we practice noticing things just as they are, without assumptions about our bodies or the poses. We might notice the touch of our feet on the floor, the pattern of each breath, and how the spine changes in each pose. Beginner’s Mind implies an openness to learning and receptivity in body and mind.

You can initiate Beginner’s Mind at the beginning of a practice session by sitting or standing quietly in a tall and spacious position. Relax your jaws and soften your eyes, as though your eyes are going out of focus. Allow your field of vision to widen, so that you’re aware of your peripheral vision rather than the narrow focus we use to read.

This softening of external visual focus allows your inner focus to become clearer, and you can become more aware of sensations of the poses as you practice. As you move from pose to pose, notice whether your mind wanders or becomes judgmental, and pause again to soften your gaze and allow your attention to expand into the pose. Whether beginning or advanced, all yoga students can benefit from practicing Beginner’s Mind.
Julie Gudmestad, April 2021

Julie wrote the “Anatomy of a Yoga” column in Yoga Journal magazine for 7 years. She has also written a series of articles aimed at instructors in the “For Teachers” column for Yoga Journal as well as an article for Yoga International.

THE LONG AND SHORT OF LEGS

by Julie Gudmestad
Published in Yoga Journal, September/October 2004

Many people struggle to lengthen their hamstrings, but working too aggressively can lead to injury. Here are some crucial tips for getting a safe stretch.

I WAS TEACHING AN out-of-town workshop and was just about to start a class when one of the students approached me. Looking a bit worried, she described a nagging pain at one of her sitting bones. The spot was tender to sit on, she said, and decidedly painful in some asanas. “What’s causing the pain?” she asked. “What can I do about it?”

Sadly, I hear this complaint with increasing frequency as I talk with yoga students from all over the country. The problem usually arises in experienced practitioners with very flexible hamstrings—often women, though not always. The pain lingers on and on, with little or no progress toward healing. If these students were to discontinue all the poses that elicit the pain, their practice would be significantly limited. Often, they don’t seek medical attention, because it seems like a relatively minor problem; instead, they opt to self-treat by practicing lots of poses that stretch the sore area.

There are a number of conditions that can cause pain at the sitting bone, including some serious lower back and sacroiliac injuries. If the pain is intense—especially if it is associated with pain in the back or farther down the leg—the situation should be evaluated by a health care provider who can establish an appropriate treatment plan. However, chances are very good that strained, overstretched hamstring muscles are the culprit. And if they are, there’s good news: By changing his or her yoga practice, the student can support the hamstrings’ natural healing process.

The Sitting Bone’s Connected to the…
THE HAMSTRINGS ARE THE large group of three muscles that fill the back of the thigh. Two of the muscles, the semitendinosis and the semimembranosis, are in the medial (inner) section of the thigh. The third, the biceps femoris, is in the lateral (outer) portion of the back of the thigh. All three muscles originate on the ischial tuberosity—the bony protuberance at the bottom of the pelvis that is commonly called the sitting bone—and the biceps femoris has an additional attachment on the back of the femur, or thighbone. The hamstrings insert below the knee on the two lower leg bones, the tibia and fibula.

Most people can feel the hamstrings with their own hands—the muscles are the closest ones to the skin of the back of the thigh—and can follow them all the way down to the knee. It’s even easier to find the hamstring tendons behind and just above the knee. To do this, place your heel out in front of you while sitting on the floor or in a chair. Keeping your knee partially bent, dig your heel into the floor as if you were trying to pull the heel toward you. When you do this, the tendons will stand out and be easy to see and touch.

The hamstrings have two primary actions: knee flexion (bending the knee) and hip extension. When you’re squatting, your hips are flexed; you bring them into extension when you stand upright, placing the thighbones in line with the torso. When you stand on your right leg in Vīrabhadrāsana III (Warrior Pose III) and lift your left leg to hold it parallel to the floor, your left hamstrings are creating hip extension. When you lie on your stomach, bend your knees, and lift your feet so you can grab your ankles for Dhanurāsana (Bow Pose), the hamstrings are creating knee flexion. (The hamstrings also assist in rotational actions at the hip and knee.) To stretch your hamstrings, you need to keep your knee straight and flex your hip (in other words, fold the front of the thigh and the abdomen toward each other). One of yoga’s classic hamstring stretches is Uttānāsana (Standing Forward Bend), in which the knees are straight, the torso hangs down, and the abdomen eventually rests on the front of the thighs.

Too Much of a Good Thing
WHY DO SO MANY YOGA students develop the nagging, frustrating pain that indicates strained hamstrings? Think about the poses that usually make up your yoga practice. On an average day, do you do lots of poses that stretch your hamstrings? Do you do many standing forward bends, such as Uttānāsana and Prasārita pādottānāsana (Wide-legged standing forward bend), and many seated forward bends? Chances are, the answer is yes; most students include quite a few of these poses in each practice session. Several other standing poses also lengthen the hamstrings, including Trikoṇāsana (Triangle pose) and Pārśvottānāsana (Intense side stretch pose). And let’s not forget Adhomukha śvānāsana (Downward-facing dog pose). If you practice Aṣṭāṅga Yoga, Power Yoga, or a similar flowing yoga style, you probably do dozens of Down dogs every time you’re on the mat. All of this stretching can cause the hamstrings to become very flexible and even overstretched in relation to the other leg and hip muscles.

The plot thickens if you don’t do much to strengthen your hamstrings. These long, vulnerable muscles are then liable to develop microscopic tears if a big load is placed on them, whether by stretching or contracting; they simply don’t have the structural integrity to handle the intense pull developed by a big stretch or the internal tension developed by a big contraction, and the tissue breaks down.

I’ve never seen a practitioner create a dramatic and debilitating rupture to the main body of a hamstring by doing yoga, although such injuries are common in sports activities that demand more explosive hamstring movements and sudden violent stretching, such as football, baseball, soccer, and weightlifting. Instead, the usual breakdown in yoga students seems to be microscopic tearing where the hamstrings attach to the ischial tuberosities. The body responds to those tears with pain and inflammation, which includes swelling, so of course it’s uncomfortable to sit on the sitting bones. The muscle still functions, but it will probably be uncomfortable to stretch or contract it.

A Repair Manual
THE FIRST LESSON MANY yoga students with injured hamstrings need to learn is that stretching isn’t always appropriate for injured or painful body parts. When you tear soft tissue, including muscles, tendons, and ligaments, your body begins its repairs by stitching tiny fibers of connective tissue across the damaged area. If you stretch the injured tissue, the tiny fibers can be torn loose, disrupting the healing process and lengthening the time needed for complete repair. In fact, if you repeatedly disturb the healing process, the tissue may never heal completely and the injured area can become chronically painful and inflamed. In addition, if the area does eventually heal, the repeated tearing and healing can create heavy scar tissue, which tends to receive less blood flow and be less pliable than normal tissue, setting the stage for reinjury.

By now it should be clear why my first recommendation to students with strained hamstrings is to stop stretching them immediately. Poses that put a lot of leverage on the hamstrings, like seated and standing forward bends, should be completely avoided during the healing process. Some other poses that normally pull on the hamstrings can be modified so they can be included in your practice without reinjuring the hamstrings. In Trikoṇāsana, for example, don’t lower your torso to your maximum; instead, place your hand on a block or a chair, removing the temptation to push too deeply into the pose. A similar modification with two blocks can be used for Pārśvottānāsana.

In Supta pādānguṣṭhāsana (Reclining Hand-to-Big-Toe Pose), don’t hold on to your big toe; instead, use a belt to catch your foot, and don’t pull on it forcefully. In Utthita hasta pādānguṣṭhāsana (Extended Hand-to-Big-Toe Pose), rest your foot on a low ledge or piece of furniture so you feel no stretch in the back of the leg. In both poses, focus on strengthening the legs and lengthening your spine rather than on stretching your hamstrings. The bottom line in these modifications: Never elicit hamstring pain in any pose.

Patience, Patience, Patience
ONCE YOU STOP STRETCHING and reinjuring your hamstrings, the real healing can begin. Unfortunately, the hamstrings are notoriously slow to heal. Give them several weeks of rest at the very least. The healing progress is usually so gradual that you won’t notice a day-to-day improvement. It’s more likely that after a few weeks, you’ll look back and realize that the pain and stiffness have decreased.

When you are aware that your hamstrings have improved and are less sensitive to movement, it’s a good idea to add some mild strengthening to your healing regimen. Put on a heavy shoe, a boot, or a one-pound ankle weight and lie on your stomach. Keeping your thigh on the floor, lift your foot about a foot off the floor; this causes the hamstrings to contract as they flex the knee. Don’t do more than 10 repetitions per session for the first week or so, then gradually increase to three sets of 10. (Aim for three sessions each week.) One pound is a very light resistance; if even this small amount of weight causes discomfort, you’re not ready yet to begin strengthening. Wait another week or two and then try again. Remember that patience must be your mantra; sometimes the hamstrings can take three to six months to heal completely.

Strengthening is important to recovery not only because it increases circulation, which promotes healing, but also because strong, healthy muscle tissue is much less likely to tear in the future. So whether you are recovering from hamstring problems or simply want to prevent them, it’s very important in your asana sessions to regularly include poses that strengthen the hamstrings, like Vīrabhadrāsana I and II and Setubandha sarvāṅgāsana (Bridge Pose). (To make sure you’re engaging your hamstrings in Bridge, draw the tops of your shins back toward your tailbone.) If you want to supplement your yoga with other activities, walking and running are good hamstring strengtheners and also have the benefit of pumping life-giving blood through the muscle tissues. (Cycling is fine too, but it will build your hamstrings significantly only if your feet are clipped to the pedals.)

In general, it’s best to stretch your hamstrings only after they’ve been warmed up by a walk or a series of active poses in which you don’t push the edges of your hamstring flexibility. Be sure to practice a wide variety of poses, and avoid making hamstring stretches the narrow focus of your yoga sessions. Finally, don’t be too aggressive in your hamstring stretches. Feeling pain in these poses can be a signal that you’re doing microscopic damage to the muscles. Learn to be patient and present with the sensation of stretch rather than pushing it so far that it becomes pain. Your hamstrings are too central to most yoga poses—and to the rest of your life—to risk injuring them.

Thus Spake BKS Iyengar, Part V

The following are excerpts from Thus Spake BKS Iyengar by Noelle Perez-Christiaens,

©Institut de Yoga BKS Iyengar-Paris 1979

9. PHALA
“THE FRUIT”
Phala (pronounced with a ‘p’ followed by an aspirate ‘h; and not with an ‘f’ sound) also signifies the result, the reward. Already in the Sanskrit we find one meaning attributed to the word ‘fruit’ in our Western languages. It comes from the root PHAL, to burst, to cleave, to emit heat (as in fire). A fruit comes away of its own accord in the hand, when it is ripe, and can burst under the pressure of its own juices. Think of apricots or plumbs on a hot day.

Phalayoga is a reward, the obtaining of the result designated by the word ‘yoga’; it is to harness oneself (yoked) to a work, not to let any of the vital forces that one can bind together, bale together to use for the same end, be dispersed. Then the fruits of our labours will come by themselves, at the right season. Iyengar says, “All would find their own fruits if they would only listen.” (X51) Most students miss the fruits of their labours because they haven’t listened properly to the Master. As Christ said, “They have ears and hear not, eyes and see not.

At this point. I think it good to recall that it is not enough simply to hear, but that we must ‘listen’ with particular attention, with that conscious perception which takes us back to manas. We have to work so hard at hearing! Hearing means understanding, too. Manas must refine the sense of hearing that, finally, we can listen, that in listening we can hear, and thus we may understand what to do and what not to do: “It is never a question of ‘what am I doing? but of ‘What am I not doing?’” (J3)

Then the fruits of the synthesis will be given of their own accord, and will fall into our hands like ripe pears.

—One must not seek, one must search.

—One must not see, one must look at.

—One must not hear, one must listen to.

—One must not touch, one must palpate.

—One must not smell, one must sniff.

(X249)

10. PRAŅIDHĀNA
“COMPLETE SURRENDERING”
Another piece of advice from Patañjali: “the surrender to Iśvara brings samādhi,” he wrote (II.1, 32, 44).

In the word praņidhana, prana gives the idea of forward movement and intensity. Dhāna comes from the root DAH, which means to put, to place, to set up, to establish. Praņidhāna is thus to be placed, stretched towards something; it’s also to give oneself over to, the respectful conduct of a pupil towards the master; it’s attention sustained, the complete surrender to the master’s hands, or to a [guide for aiding the yogin on the path to spiritual emancipation] (Iśvara).

How will Iyengar go about making us feel this surrender to Iśvara concretely, in our own bones, against all anguish and fear? Through a surrender beyond all reckoning, beyond all self-defense mechanisms, to the guru who is, for the pupil, the ‘rough map’ passing on the BEING, before the ‘interior guru‘ is awakened. Iyengar uses the word ‘surrender’ to make us grasp this complete self-abandon to Cosmic Forces, to Energy, through its various manifestations which touch us. “Surrender to me,” meaning in effect, “relax your action against me,” was the order I received every time the Master [Iyengar] came to correct a mistake in a posture. Everything was tensed, contracted, either by the false balance (because I was out of plumb), or by the ridiculous effort I thought I had to make to do what was required of me. If I hadn’t relaxed, Iyengar could have hurt me or himself; first he took a step back, then the order came, and with it went all my resistance and hesitation, and he adjusted everything little by little.

This surrender, by breaking the chain of distracting thoughts, increases the intensity of one’s concentration.” (J58) Obviously, confidence increases with practice. The Master insists on this point, seeing numerous pupils who do not truly hold fast to what he asks for: “If you do not surrender to your Guru (in life), at least at the time of learning, surrender. If not, the ego is responsible for that pride.” (Q13) He might have added, “Unless the disciple gives her/his ego and follows the guru’s instruction s/he cannot make physical, mental, or spiritual progress.” (Q14)

And so, as a result of continual surrender, surrender without argument, in spite of her/his fears, little by little the pupil (who already has many years of practice and ‘passivity’ behind her/him) becomes ready for the spark of meditation which captures her/him in a posture, during a lecture, on a walk… Where is s/he? Is it in her/his body, or out of it* that s/he seizes upon the light that is dissolving her/him? Who is s/he? S/he perceives directly without intermediary help that only Energy exists, and in intense fear, s/he tastes of this extraordinary harmony. But nothing terrible happens, for s/he is so used to confronting fear through the complete surrender to her/his guru. “The highest form of surrender is meditation.” (X127) In meditation there si nothing left but the BEING: IT, and nothing else.

* Cf., II Corinthians 12:2, ‘whether in the body or out of it, I do not know

Noëlle Perez-Christiaens, A Grand Dame of Yoga (1925 – 2019)

Founder of the Institut Supérieur d’Aplomb,
and the Institut de Yoga B.K.S. Iyengar de Paris

Infos Yoga magazine, N˚ 129, November 7, 2020, by Anaïs Le Flohic

Summer 2019: I’ve been training with Serge Gastineau and Catherine Bellières for a year now, and I’ve questioned almost everything I’ve ever learned about yoga before. Regularly during the seminars, Serge talks to us about the work of Noëlle Perez and where our physiological lumbar arch should be.

I’ve spotted Noëlle Perez’s books on the shelf of the A.Y.L.A. association’s library at the Atelier Yoga in Nantes. Their covers are all worn, a little outdated, and faded. But I don’t dare touch them: it all seems a bit obscure and complicated, and I have little knowledge of anatomy.

During the April seminar, it all clicks during the lunch break, [when] Catherine explains to us how Noëlle Perez demonstrated that bone calcification occurs differently in different populations. Beyond individual anatomical differences, it varies depending on our lifestyles, particularly when it comes to hip joint function. We’re sitting near the bookcase, and Catherine pulls out one of Noëlle Perez’s books and passes it around among the trainees.

At the end of the day I decide to borrow one at random because the title is scary, Pathology of Yoga: Beware! Yoga Can Be Dangerous for You. Without realizing that I’ve just found a treasure, it will take me more than three months to open it on August 8, 2019, the date Noëlle Perez passed away.

She is an extraordinary personality, whose valuable writings are more relevant than ever. At 34, she had visited yoga teachers in Europe and found none who satisfied her, so she went to Pune, India in 1959. She became one of B.K.S. Iyengar’s first Western students and one of his closest. Back in Paris, she opened the B.K.S. Iyengar Yoga Institute, the first in France, inaugurated by Iyengar [himself] in the 1960s.

She practiced yoga for years, and over time, several joints became very painful, even after meeting Iyengar. This was because there was a misunderstanding on both sides: she didn’t always correctly interpret what he was explaining, and he was used to Indians, generally very supple, who remained upright. He couldn’t imagine that someone could have lost their balance.

The veil began to lift in 1976, in two stages. On the one hand, during a visit to Parisian museums with Iyengar. In the exhibition dedicated to Ramses, the Master showed her all the statues that were slumped forward. Conversely, at the Guimet Museum, he pointed out to her how Indian statues were upright and how light they appeared.

On the other hand, Noëlle Perez attended an exhibition on “The Origins of Man” organized by Professor Yves Coppens. She has a flash of inspiration in front of a comparative chart between monkeys and humans, accompanied by the following caption: “The calcaneus thickens; from now on, it will bear all the weight.” This shortening of the main bone of the human foot is what allows for upright posture.

She finally understandood what it means to be upright; the weight falls on the heels: “That’s what Iyengar had tried to make me feel, but I hadn’t understood a thing. Immediately, I put the weight on my heels, hollowing my groin and moving my pelvis back as if to sit down, and I felt all the tension in my back disappear.”

This would become her major research focus; throughout her life, she constantly warned (and “shouted daredevil,” as she put it) that we Westerners had lost our composure, while trying to bring us back to this awareness of correct alignment.

She possessed a colossal capacity for work, like all those who had truly practiced yoga. Her concentration and endurance were highly developed. Throughout her career, she wrote more than 50 books. At 83, she completed a 2,500-page doctoral thesis at the École des Hautes Études en Sciences sociales. Her interests were numerous and far broader than yoga, encompassing ethnology, anthropology, the history of religions, and more.

Regarding yoga more specifically, throughout her life, she maintained a commitment to accuracy and extreme precision in her remarks. As she humorously notes in one of her books, she’s a Capricorn with Virgo ascendant, which helps! A sign of great teaching skills, capable of explaining the same thing dozens of times, each time in a different way, to make herself understood by as many people as possible.

Noëlle Perez took into account the obstacles linked to language differences: Iyengar’s mother tongue is Kannada, from the state of Karnataka. His thinking is steeped in Sanskrit and Eastern culture. He expressed himself in Indian English, which she herself transcribes into French. There are bound to be errors, if not unintentional distortions, in some of his remarks. All of this is magnificently exposed in Sparks of Divinity and Thus Spoke B.K.S. Iyengar. She explains: “When we want to understand the depth of centuries-old Indian experience conveyed by Iyengar’s thought… in a language that is not his own!!!” …we must at all costs discover which Sanskrit word, which Eastern concept he translates into an English word. Otherwise, we’re sure to miss the point and understand only a small part of the Indian message he’s trying to convey to us.”

Her books are both technical and accessible, written in a style full of wit and anecdotes; boredom is never present! They are richly illustrated with photos, unfortunately often of poor quality; the resources at the time were not those of today.

One of the great things about her books is that she explains how she herself injured herself for years in yoga postures. She uses her experiences to inform the teaching and transmission of yoga. She even goes so far as to publish examples of photos of herself in awkward positions even though she didn’t know it, which is probably a unique case in the history of yoga! Throughout her life, she has maintained the attitude of a researcher, an explorer, and a tester of different avenues. She has a desire to alert yoga practitioners and teachers, and the enormous ability to question herself thoroughly. In my opinion, one could even go so far as to say that she promotes a form of prevention in public health.

Her private life, from which she regularly draws examples (her great-grandmother Man’line, her dog Panta, etc.), is astonishing in more than one way. Childless, she devotes her life to yoga and her field research, punctuated by numerous travels to the four corners of the planet. Her research on how carrying loads on the head shapes the spine took her to Setúbal, Portugal. There, over 50, she met Miguel da Fonseca, a fish unloader (fish auctioneer) who would become her husband.

She would closely involve him in her work; he would be her daily guide. Having remained poised throughout her life—an essential element for practicing her profession without damaging her back—he would show her in a thousand ways, and in every day of her life, how to proceed.

Noëlle Perez is not known for being easygoing, as she herself admits. She is outspoken (“śavāsana is not snoozing!”) and doesn’t mince words when she considers a piece of work to be of poor quality. People say of her: “If you want to be corrected in yoga, go see Noëlle. She’s not easy, but with her you’ll learn.” I believe that, simply put, her high standards with her students were commensurate with her total commitment to yoga.

Noëlle Perez truly wanted her work to be disseminated, known, and extended; she has written as much on several occasions.

Given the accuracy of her vision and the strength with which she demonstrated her theories, supported by countless examples, photos, and experiments, it is surprising that Noëlle Perez is not better known in the yoga community. Apart from the website of the Institut Supérieur d’Aplomb, there is little information about her online; her books are no longer published. Perhaps her iconoclastic vision, which called many things into question, was too disturbing?

I sincerely hope that this article will contribute to her influence and inspire you to discover more about her.

Bibliography

– Warning! Yoga Can Be Dangerous for You – Pathology of Yoga, B.K.S. Iyengar Yoga Institute, 1980.

– Being Aplomb, first edition: B.K.S. Iyengar Yoga Institute, 1977; Second edition, fully revised and corrected: Institut Supérieur d’Aplomb (ISA), 1983

– Thus Spoke B.K.S. Iyengar, B.K.S. Iyengar Yoga Institute, 1979.

– Carrying on Oneself – Carrying oneself, carrying, behaving, transporting, loading and unloading oneself without damage – Contribution to the study of a universal category of techniques: carrying loads on oneself. Dissertation in social anthropology and ethnology, defended on May 20, 2008, Ecole des Hautes Etudes en Sciences Sociales.

The author Anaïs Le Flohic is a yoga teacher in Rennes, France.